Showing posts with label tutorial. Show all posts

Friday, 1 April 2016

Talk on design and composition of felted wraps. Part 3 - Dynamics and Movement

This is Part 3 of a translated transcript of the Russian felt artist Maria Gladchenko talk.
 https://www.facebook.com/maria.gladchenko?fref=ts    http://www.livemaster.ru/madsilkworm 
Part 1 - is Here  
Part 2 is Here

 In Part 3 she is talking  about Dynamics and Movement.

If we want to use a lot of small elements in our wrap and create well balanced piece we need to arrange the bits properly, give them direction and create flow and movement.


We need to be sure that this multitude of small elements is not positioned randomly or just thrown together but arranged so that all of them have got general direction in common, a flow similar to some nature phenomenon like fluid and harmonious movement of shoal of tiny fish.


The dynamic is always associated with organic movement of life and nature in contrast to static and geometrical compositions which are often considered as artificial and somewhat industrial. Fluid movement of the nature is the source of our inspiration.
 

This picture of a beautiful maple tree may look as a random array of small elements but it’s just at first glance.
There are a few centres from which the elements are spreading in groups and in different directions. Every branch is equivalent to a group of similar elements with their own directions of movement. We could do the same in our composition of the wrap, we group details.   At first we define the position of the centres of the flow – the largest or the brightest or the most prominent element.

This arrangement should be done according to the same recommendations as above ( avoid stark symmetry, consider how it’ll look wrapped, balance…)  When we decided on the position of the main central elements we can start filling the entire surface of our piece working with the array of small elements.
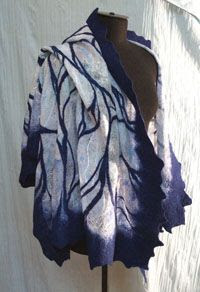
Here the small leaves follow the lines of the wrap folded around the figure adding the softness and feminine feel.
 

To create more dramatic impression and add more energy to our composition we can use more vibrant elements like this spiral design with the centre of the spiral positioned just off geometrical centre of the wrap.

 
And here is a finished piece in all its glory!
 
                                                                    The End!
I'd like to thank Maria again for the generosity in sharing her knowledge and experience! 

Talk on design and composition of felted wraps. Part 2 - Balance and Symmetry


This is Part 2 of a translated transcript of the Russian felt artist Maria Gladchenko talk.
 https://www.facebook.com/maria.gladchenko?fref=ts    http://www.livemaster.ru/madsilkworm 
Part 1 - is Here  

 In Part 2 she is talking about scale, balance and symmetry.

Now let’s talk about the wraps designed without any borders, where the central area is the main feature of design and creates major visual impact. The rectangular shape of wrap or scarf may deceive you and create an illusion of being a picture. Pretend to be a picture it persuades you to fill the whole space of the wrap and create a real picture like a piece of fine art. But you need to be warned that the wrap is not a picture in this context. And it can’t be.
Let’s have a look at this wrap as a very good example.


It was inspired by world known work of Vincent Van Gogh. Despite obvious similarity it’s not a literal copy. The colours and style are very similar but there is no such thing as a horizon line and no cypress trees. Why?  When the wrap is draped around the shoulders the dark spots of trees will be positioned at wrong place and the distinctive shape of the trees will be distorted and unrecognisable and look just as splash of dark colour.
The same it’s true when the entire space of the item is occupied with large single image of some face or figure and alike. After you place the wrap on the shoulders the images will not look as they intended to be. To illustrate it we show this beautiful piece with striking figure of panther.
 
When presented as a wall hanging it looks fantastic but in a wrap the cat’s figure is unrecognisable and looks rather awkward especially from the back

Apparently this interesting idea of creating a picture doesn’t always work!
But it could work – if we consider Scale first. It may work if there were a few much smaller cats’ figures instead of one very large one.
Now we see that there are two extremes – to use a very large single element or use a lot of very small elements. Both these ways could fail in creating beautiful item.  We need to find a proper Balance, balanced approach to design and composition of our piece. The mother-nature is always at hand to help! Look at this beautiful cat with marbled fur coat!

There is a variety of sizes of dark and light markings changing their shapes and creating a sense of movement and direction.
One of the Maria’s lovely pieces as an example of thoughtful approach and right choice of the elements’ scale


Another feature of the rectangular shape which could lead to wrong design is its symmetry. Very often it seems obvious that the design should be symmetrical with the compositional centre placed in the centre of the item.
We decided to create a symmetrical spiral. If it’s in the very centre it’ll draw all the attention to this point which is not very good actually. Even worse in reality it’ll never be at the geometrical centre. More often it will be off centre and create disproportion so it would be more practical and attractive if we position that spiral close to one end (a shoulder)
See this idea realised in this example:
 
So - when we are to create a symmetrical design on the central part of the wrap which will be on the back of human figure it’s better not to place large distinctive elements (geometrical or colourful) strictly symmetrical or in the very centre. It’s more advisable to position them off centre and in some random order.

But when symmetry works well? Imagine the design of the future wrap as follow

Lovely movement on the piece but if we place two extra very distinctive and symmetrical elements to the ends they will add emphasis and create the feel of finished piece
Another design approach is to make the ends completely different 
 
. And again it will look better if the dividing line is not in the middle but is slightly off centre

 
Or it could be the gradual change of colour


Part 3 - Dynamics and Movement - is Here, Part 1 - is Here   

Wednesday, 30 March 2016

Talk on design and composition of felted wraps. Part 1 - Size and Shape


This is a translated transcript of the talk the Russian felt artist Maria Gladchenko (Мария Гладченко) has given as a part of Nina Demidova’s  project “Soapy Wednsdays” http://www.felt4fun.ru/felt_wednesday/


Maria was educated as an artist and makes stunning wraps in her own technique ( https://www.facebook.com/maria.gladchenko?fref=ts    http://www.livemaster.ru/madsilkworm,), but this talk was on the subject of designing wraps and about composition mainly. I do not make wraps and may never do  but  consider the  design and composition of rather large felted items as very important and interesting on their own rights.

The transcript is rather schematic and has been written in basic language just to make the text shorter (and my job easier!). If you have even a basic command of spoken Russian I’d strongly recommend listening to original talk.

When you are thinking of designing and creating a luxurious wrap there are a lot to consider! Maria was very expressive about the history of using wraps, about their beauty and comfort but I came just to the list of what matters!

  1. Size After a lot of experiments Maria came to the size she consider as optimal – approx. 70cmx190cm. Of course the dimensions may be very individual, but this width allows you not only to drape the wrap beautifully around the shoulders but also to cover the lower back to give the feel of warmth and comfort.
  2. The back side of wraps. We can’t ignore the back side of the wrap because it’s always visible at least partly never mind how we try. There is no point of making the both sides equally ornate, a neat backside is enough. Very effective way is to have the back side in colours contrast to the front. Most preferable to create the back side plain, without images to avoid overwhelming and just to show off the decorative front side. 
  3. The wraps are accessories which take a prominent part in the women’s’ wardrobe partly because their size. The large size provides the designer (or feltmaker in our case) with huge variety of colours, shapes, patterns and so on to play with.
  4. Shape and border. Traditionally the wraps are of rectangular shape and very often have such a feature as a border which frames the main design and creates a finished item. The finished ends are very important especially in the case of wrap with small busy patterns in the main area. Without a proper border it may look just as piece of fabric cut off the roll and not as a finished piece.  It could be just a fringe at the short ends. Look at the example:


  Monotonous repetition of random or regular variety of small elements without a border (or a fringe in this case) will not look as an finished item but decorative border frames it and gives it a professional look. Here the border is matching in colour with the main design and frames the wrap.
    -       The border could contrast with the main area and create an additional decorative element.
    -        It could be the main or even the only focus point of the wrap – the main area could be plain and the border creates the main decorative feature of the wrap. 

-       Another way of creating the border – when the border gradually grows (in colour or shape) out of the central area. The centre is filled with tangled stems and there is a transition to flowers on the border.  It’s excellent artistic approach.  
 

-       If you create a border it’s better be distinctive feature – if the wrap is rectangular, the edges should be straight, in wraps with irregular shape the irregularity should be made obvious as artistic feature and not as an accidental error or just because you can’t cope with the proper shape.

-       If the border or the edges have some pattern in shape (waves, triangles) these shapes should be bold, the same as above.

-       The end of the wrap should be felted to perfections because they catch all the attention of the viewers and you could concentrate the main décor on them and leave the central area plain or at least more restrained in colour and design. It’s better to decide where you are going to put the main focus point. 

-       The use of the border as a separate decorative feature gives enormous space for your creativity. To create a border you can use: lace, fringe, locks, tassels, small felted ball, perforation with small holes – the choice is endless.   

-       Sometimes we could ignore the border altogether – mainly in the wraps of irregular shape where any kind of border is completely out of place.  
 
To be continued! In Part 2 - scale, balance, symmetry - is Here

Monday, 20 October 2014

How to install magnetic snap Tutorial

 I was asked to demonstrate how I install the magnetic snaps in my cases. Here we are (it's for you Teri!)
This is a pictures of finished case, snap installed, nothing is visible from outside, looks neat.
Felted case with magnetic snap
At first the case is half-felted:

And this is what I am going to install - the 4-part snap.