
This is a translated
transcript of the talk the Russian felt artist Maria Gladchenko (Мария Гладченко) has
given as a part of Nina Demidova’s
project “Soapy Wednsdays” http://www.felt4fun.ru/felt_wednesday/

Maria was
educated as an artist and makes stunning wraps in
her own technique ( https://www.facebook.com/maria.gladchenko?fref=ts
http://www.livemaster.ru/madsilkworm,), but this talk was on the subject of designing wraps and about composition
mainly. I do not make wraps and may never do
but consider the design and composition of rather large felted
items as very important and interesting on their own rights.
The transcript is rather
schematic and has been written in basic language just to make the text shorter
(and my job easier!). If you have even a basic command of spoken Russian I’d
strongly recommend listening to original talk.
When you are thinking of
designing and creating a luxurious wrap there are a lot to consider! Maria was
very expressive about the history of using wraps, about their beauty and
comfort but I came just to the list of what matters!
- Size After a lot of experiments Maria came to the
size she consider as optimal – approx. 70cmx190cm. Of course the dimensions
may be very individual, but this width allows you not only to drape the
wrap beautifully around the shoulders but also to cover the lower back to
give the feel of warmth and comfort.
- The back side of wraps. We can’t ignore the back side of the wrap
because it’s always visible at least partly never mind how we try. There
is no point of making the both sides equally ornate, a neat backside is
enough. Very effective way is to have the back side in colours contrast to
the front. Most preferable to create the back side plain, without images
to avoid overwhelming and just to show off the decorative front side.

- The wraps are accessories which take a prominent part in the
women’s’ wardrobe partly because their size. The large size provides the
designer (or feltmaker in our case) with huge variety of colours, shapes,
patterns and so on to play with.
- Shape and border. Traditionally the wraps are of rectangular shape and very often have such a feature as a border which frames the main design and creates a finished item. The finished ends are very important especially in the case of wrap with small busy patterns in the main area. Without a proper border it may look just as piece of fabric cut off the roll and not as a finished piece. It could be just a fringe at the short ends. Look at the example:


Monotonous repetition of random or regular variety of small elements
without a border (or a fringe in this case) will not look as an finished
item but decorative border frames it and gives it a professional look.
Here the border is matching in colour with the main design and frames the
wrap.
-
-
The border could
contrast with the main area and create an additional decorative element.
- -
It could be the main or even the only focus
point of the wrap – the main area could be plain and the border creates the
main decorative feature of the wrap.

-
Another way of
creating the border – when the border gradually grows (in colour or shape) out of
the central area. The centre is filled with tangled stems and there is a
transition to flowers on the border.
It’s excellent artistic approach.

-
If you create a
border it’s better be distinctive feature – if the wrap is rectangular, the edges
should be straight, in wraps with irregular shape the irregularity should be
made obvious as artistic feature and not as an accidental error or just because
you can’t cope with the proper shape.
-
If the border or
the edges have some pattern in shape (waves, triangles) these shapes should be
bold, the same as above.
-
The end of the wrap
should be felted to perfections because they catch all the attention of the
viewers and you could concentrate the main décor on them and leave the central
area plain or at least more restrained in colour and design. It’s better to decide
where you are going to put the main focus point.
-
The use of the
border as a separate decorative feature gives enormous space for your
creativity. To create a border you can use: lace, fringe, locks, tassels, small
felted ball, perforation with small holes – the choice is endless.
-
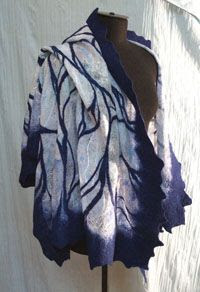
Sometimes we
could ignore the border altogether – mainly in the wraps of irregular shape
where any kind of border is completely out of place.

To be continued! In Part 2 - scale, balance, symmetry - is Here


